Tuesday, March 28, 2017
Installing Applications Under Linux
Installing Applications Under Linux
Installing rpm packages on Redhat,Fedora Based Systems : - For Fedora based systems rpm is the standard format for packages ,
To install a rpm package use command:
rpm -i PackageName
TO uninstall rpm package use :
rpm -e PackageName
PackageName is different from filename You used to install the package . This is actually the name of software that is installed.
If you have some file on your system and you dont recognize to which package it belongs use the command : -
rpm -qf filename with path
this would return the name of package the file belongs to.
If you have a rpm package but you are unsure about the package that is its name ,description etc use this command to get information about the package: -
rpm -qpi package name
If you want to know what files and where the rpm installs for a specific package use the following command : -
rpm -qpl packagename
If you want to upgrade an existing package on your system use :-
rpm -Uvh packagename
this command uninstalls the old version of the package and installs the new version of the package.This commands works even when there are no existing version of application installed hence this can be effectively used for Installing new packages.
However freshen(-Fvh) option dosent install new package if it dosent exist and only upgrades existing package on the system.This can be particularly useful if you have a number of packages and only want to upgrade the packages and dont want to install new packages.
You can use the command
rpm -Fvh *
For the above purpose
rpm -qa | less
Views list of installed applications , one screen at a time.
rpm -qa
List all applications installed on the system
rpm -qa | grep -i
To search if a particular package with
Installing packages under Debian GNU/LINUX based distributions : - Debian Linux based distributions like Ubuntu,Kubuntu ,Debian etc come with an excellent package management system (apt-get) which allow for installation of software with relative ease. Debian has been traditionally easier of Linux distributions in view of software installation.Debian Linux uses the deb package format for packaging software similar to the rpm package on Redhat and fedora based systems.
However before one starts using apt-get software repositories have to be set-up correctly on the local machine. Repositories are a collection of softwares stored on the Internet which could be used for installation of software using apt-get. The location of repositories is stored in the machine in the file /etc/apt/sources.list and could be modified for removing or adding additional repositories locations. A comprehensive list of available repositories could be found at www.apt-get.org .
After completing setting up of repositories one has to make local database on the machine storing information about softwares in sync with the repositories making the information about package available on the net locally available and could be done with command .
apt-get update
Now once the package information is cached locally one can Install applications or search for available package using command. However one has to be connected to Internet for installing software though software could be searched without the Internet.
apt-get install packagename
One important feature of apt-get is that user is shielded from the trouble of dependency . If a application needs additional libraries,package etc to be installed they are automatically searched from the repositories and installed before installing the application . This is one of the most important feature of installing application through apt-get.
To search for a particular package in the database stored locally.
apt-cache search packagename
To upgrade all the softwares on the system
apt-get upgrade
To remove a particular package
apt-get remove packagename
apt-get autoclean
Above option cleans packages in cache that are found useless or partially complete and deletes them.
Installing Debian(.deb) Packages :-
dpkg --install
To install a package or upgrade on the system.The name is the complete name of package file ending with .deb extension . If all the packages and libraries needed by the package your are installing is found on the system the installation proceeds and package is installed. However if some library is missing or files needed by package is not found on the system appropriate error would be shown and dpkg would exit showing error.
dpkg --remove
To Remove already installed application from the system. However this command does not remove the configuration file that may be needed for re installation of package however if you want to remove the configuration file also . Following command could be used :-
dpkg --purge
dpkg --status
dpkg --listfiles
Above command lists the name of all the files installed by package specified as
dpkg -l * | grep ^i | more
Above command displays all the installed application on the system page wise.
dpkg -l gtk* | grep ^i | more
Above command displays all the installed applications on the system beginning with name gtk.
However one can also use dselect to install or remove applications on the system. dselect is a menu driven application
for installing and removing application.
Installing applications using yum : -
Similar to apt-get on debian based system . Redhat and Fedora ships with yum for installation of applications from repositories.
The installation of software gets very easy with the help of yum.
yum stores the repositories address in the file /etc/yum.conf . Initially it has only few repositories and should be expanded to
include more for example i added the following :
[livna-stable]
name=Livna.org Fedora Compatible Packages (stable)
baseurl=http://rpm.livna.org/fedora/$releasever/$basearch/yum/stable
gpgcheck=1
[FedoraUS]
name=Fedora US $releasever - $basearch - Latest Packages
baseurl=http://download.fedora.us/fedora/fedora/2/i386/SRPMS.os/
[newrpms.sunsite.dk]
name=Fedora Core 2 NewRPMS.sunsite.dk
baseurl=http://newrpms.sunsite.dk/apt/redhat/en/i386/fc2
[dag]
name=Dag RPM Repository for Fedora Core 2
baseurl=http://apt.sw.be/fedora/$releasever/en/$basearch/dag
[dries]
name=Extra Fedora rpms dries - $releasever - $basearch
baseurl=http://dries.studentenweb.org/yum/fedora/linux/$releasever/$basearch/dries
After completing above one should run
yum -y check-update
This command downloads header , information about all the new software available and stores it locally.
yum -y list
Above command displays the list of all the packages available for installation.
yum -y list installed
Above command displays the list of all the packages installed on the system.
yum -y install packagename
Above command downloads and installs the package after searching it in the repositories. This also downloads all the dependencies
and installs it ,before installing the package.
yum update
Above command updates all the upgradable packages on the system.
yum remove
Above command removes the package specified as
yum list recent
Above command displays the list of all the applications recently installed or updated.
yum provides filename
above command displays the package the filename belongs to.
Installing from sources : Most of the Open-Source application available under Linux is available as Source Code which needs to be compiled at the users end. This approach though is time consuming since compiling an application takes a descent amount of time depending on the complexity of the application, Also installing from sources is a bit more complex than installing from binaries. But still it does have its benefits , The applications compiled can be significantly faster than the binaries downloaded since they are optimized for your system also there are many situations when binaries are not available for your Processor or Distribution and hence compiling application from the source is the only option.
Step 1: Download the source file from the Internet usually the source files are tar archives. Extract it into a directory using the tar command.
Example if you download the file : examples-0.1.2.tar.gz
Extract with: tar -xzvf examples-0.1.2.tar.gz
For archives starting with .tar.bz2 use bunzip2 filename
after extracting the file go into the directory of the created file and execute the configure script which configures the packages source file according to your system and checks if all the needed libraries are present ,This tells how software must be compiled.If an error is shown during the execution of configre script look for the missing library and install it and then rerun the configure script. After completion of the configure scripts execution "Makefile" is created which is then used to compile the package .
./configure
make
make: - This command starts compiling the application after reading the Makefile on how to install the applications binaries. This process takes the most of the time .
After doing this login to superuser mode and execute the following command to install the applications to a suitable location.
make install
make install : - This command installs the package usually in /usr/local folder.
However if for some reason the compilation does not take place successfully try reading README,INSTALL text files in the projects directory. Usually most of the projects include documentation about installing the applications in these files.
Autopackage : Autopackage is also one of the simpler ways of installing application . More can be read about it here :
www.autopackage.org
Article (C) 2006 Ambuj Varshney
For Linux On Desktop Blog

Get This Article as PDF

Available link for download
Saturday, March 11, 2017
Installing Hacking From Linux
Installing Hacking From Linux
All you people that thought you were good hackers, because you could fool
dumb sysadmins, and do a bit of social engineering, or hack something by
following someones carefully prepared text file. Well youre about to get
fucked if you read this text file you will find out that you are a hacker
but, the only thing you can do is use someone elses ideas. So with that in
mind here goes.
I wrote this text file because i know a lot of people who could
benefit from learning to use linux, especially when hacking.
First of all you need to get linux installed on your system so goto
http://www.redhat.com I would suggest you invest $40 in buying the newest
version of RedHat linux this way you will get all the files you want/need
on one cd. If you have a problem with paying that price, then contact me
and i will ship you a copy for half that price, yes only $20! If you are
really cheap (like me :-) you could try and download it, i have gotten it
to work before but its really not worth the wait, i spent a total download
time of about 3 days to download all the files i wanted, and if one of the
files dosnt work, well youre pretty much fucked. Whatever you decide to
do, weather its purchasing a copy from me or from redhat.com, or being
cheap :-) and downloading it, you should read the linux documentation
project especially the installation part, it will save you hours of worry.
I will touch down very briefly on what you have to do to install linux, but
not nearly enough for you to understand the installation. Many people will
tell you not to buy RedHat products because theyre full of bugs, this is
true, and I couldnt agree more, but the bugs are present if youre trying
to hack teh box, so in this case just get RedHat Linux, since its by far
the most user friendly and the easiest to install. On the other hand if you
are intending to run a sophisticated webserver do NOT get redhat, get
something like slackware, or debian linux.
If you are planning to use linux to access the net etc... you will
need to read the FAQ on compatability at http://www.redhat.com, i currently
dont know of any distribution of linux that supports winmodem or any other
type of modem that uses windows software to speed it up, these modems are
generally those yukky U.S robotics modems.
From now on Im assuming you either purchased RedHat linux from me
or from RedHat. O.K lets get started, you will need to partition your
harddrive, to do this goto dos and type in fdisk choose no. 4 to view current
partitions. If you have one large partition that fills your whole harddrive
just reserved for windows then once again youre fucked. You need to back up
all your shit, before performing the steps below. Once everything is backed
up go to dos yet again and type 8in fdisk, now you need to delete your
current partition and set a new primary partition the primary partition
should not fill your whole harddrive, leave as much space as you want
unpartitioned, this unpartitioned space is what youre going to be putting
linux on. So now thats done restore your old windows shit and make sure
everything is working nice and dandy. Now pop in your redhat cd in your
cd-rom drive, and reboot your system. Follow the instructions until you
get to a screen that asks if you wish to use fdisk or disk druid to partition
your harddrive, just choose disk druid, now you need to set up a native linux
partition i recommdn 500 megs, but if you wanna be fancy put about 800 megs.
Now after you have assighned a native linux partition and labeled it / Then
you need to assighn swap space, assighn as much as you see fit mine is about
55 megs. It is also a good idea to label your dos partition i label mine
/dos this is so i can access files in my dos partition while using linux.
Once that is done click on OK and save the partition tables, when you get to
the place where you choose what to install. If you have a partition thats
more than 600 MB then choose the install everything option at the bottom of
the list, if your partition is below 600 MB, then choose everything on the
list except the install everything option. If by some chance you just want
a very basic setup, this is what i used to run, just choose x-windows, DNS
Nameserver, Dial-UP workstation,c++ development, and c development. This
will give you everything youneed to compile programs in ,linux, connect to
your ISP, run x-windows etc....
X-Windows is a graphical interface for linux its very very nice
its kinda like windows 95 but it dosnt suck as much, by the way I will be
refeering to windows 95 as winblows, for obvious reasons :-).
Once everything is installed, it will tr to sonfigure x-windows for
you, this is where it actually helps if you know every little chip in your
system, if you dont well tehn just guess, but whatever you do dont install
Metro-X, just install XFree86 x-server its better, well after all that shit
you will need to install LILO, LILO is a boot manager it allows you to boot
into dos, linux and whatever other O/Ss you may have lying around in yuor
system, once all that is set up, you will be asked if you wish to install a
printer or not, figure that part out yourself, its pretty straight forward,
so Im not gonna waste my time. I wouldnt recommend configuring a LAN
unless you know your shit about linux.
So once setup is finished , your system will reboot. WOA you just
installed linux and youre still alive its amazing isnt it. So now you
should be faced with a prompt that says LILO Boot:
you can now press tab for options this will show which operating systems you
can boot into. You should ahve the following two choices dos and linux, now
since this text file covers linux you would want to boot into linux so at
the LILO prompt type in linux or simply press return, since linux is your
default operating system. Now you should see a bunch of services starting,
this indicates that linux is loading.
When you reach the login prompt type in root and use the password
you specefied for the setup program earlier. Finally you have redhat linux
installed on your system, and hopefully youre still alive, youre still
with me RIGHT!!!!! O.K so you have logged in as root, first thing you want
to do us shadow your password file I always do thsi because then at least i
know a little clueless newbie could never get in my system, to do this type
in pwconv. Well thats all you have to do, to me its a shock that there are
so many unshadowed systems on the net when its so easy to shadow the
password file, but i guess ignorance is the satan of all gods people. Well
i guess youre like dying to show your friends how k-rad and elite you are,
so I guess well better geton to setting up linux to use the net, in other
words to dial out to your ISP. O.K heres how you do it. When youre at the
prompt type in startx this will start up x-windows. Once x-windows is
started, you should see an interface much like windows 95, to the left
should be a box named control panel, in the center you should see a window
named local-host, this is simply the rootshell just like the one you get
when you login. Now to get the modem set up, in the control panel there
should be a lot of small icons, goto the 6th one down (modem configuration)
choose what com port your modem is on, if you dont know choose SOM 1 it
seems to be the default in most computers in gateways i do believe its
COM 2, once thats done, goto the 5th icon down in the control panel
(network configuration)and click it, now choose interfaces then goto add,
choose ppp as your interface type. Put in your ISPs phone number, and
your login and password. Then choose customize, click on networking and
click on activate interface at boot time, once this is done goto done and
choose to save the configuration. Well thats it simply reboot by typing in
reboot and listen to your sweet modems music.
Now that youre connected to your ISP lets go do some surfing, once
youre in x-windows, goto start/applications and click on Netscape Navigator.
Visit http://www.rootshell.com and run a search for scan, once youre
confronted with the search results, go down and find the file named
xenolith.tgz download that file. This is a neat little scanner that scans
sites for volunerabilities, and Im basiacly gonna give you a lesson in
uncompressing files in linux. Once the file is downloaded goto the dir in
which it resides. Since its a .tgz file we would uncompress it using the
following method. Type in gunzip -d xenolith.tgz this will give you
xenolith.tar then type in gzip xenolith.tgz this gives you xenolith.tar.gz
then type in zcat xenolith.tar.gz | tar xvf - . This will give you a dir
called xenolith just cd xenolith and read the README files for installation
instructions. I just thought i would include something on uncompressing
files because many people ask me for help on the topic.
Well Im getting to the place where I have to think about what i
want to put in this text file, well heres something I will include, a
section with some useful command, so here goes. To shutdown your computer
type in shutdown -h now (your message) to reboot simply type reboot. To
compile use gcc filename.c -o filename. To talk to a user type in write
username then on the next line write your message, if you dont want people
to send you messages type in mesg n. Well i sure hop this guide helped you
through getting linux installed if you want to read books on linux and
youre cheap like me goto http://www.mcp.com and sighn up for their personal
bookshelf, and get reading tons of books for free, its a hackers dream and
all time paradise.
Now just as you thought it was over Im gonna show you a few hacking
tricks from linux not really how to hack just some useful commands, so here
goes. To telnet to a site type in telnet www.victim.com ,to telnet toa
site on a specific port type in telnet www.victim.com portnumbe. Lets say
i wanted to telnet to port 25 i would type in telnet www.victim.com 25 .
To FTP to a machine type in ftp www.victim.com. To rlogin to a machine,
many of you proably dont know what the hell im talking about so let me
explain. If you place a file called .rhosts in someones home directory and
that file has two plusses like this + + in it you can use the rlogin command
to log into the system using that account without a password. Ring a bell
in your mind? filling with fresh ideas. I use this method whenever I geta
shell account, it assures me that if they by any chance change the passowrd
I can always rlogin into the system assuming that the account has a .rhosts
file in it and the file contains + + then youre in good shape. Assume the
username of the account is lamer. So inorder to rlogin into lamers account
we would do the follwoing. Type in rlogin www.victim.com -l lamer . This
will telnet us directly into lamers account where we can start rooting the
system.
Well my hand hurts from typing too much, so Im gonna stop typing,
please if you have any questions, suggestions, or comments, e-mail them to
ameister@vol.com. Also i nee some suggestions on what to write text files
about so please e-mail me, it would be greatly appreciated. Me and some
friends are going to be making a magazine with lots of text files and other
interesting hacking material, if you would like a copy e-mail me for more
info, the price should be no mroe than $4 Shipping & Handling included.
http://www.vol.com/~ameister
Available link for download
Monday, December 26, 2016
How to Split Raster Images to a PDF file in Ubuntu Linux
How to Split Raster Images to a PDF file in Ubuntu Linux
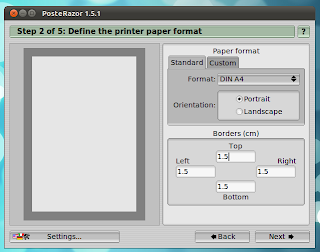
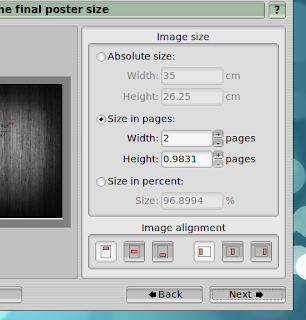
If you Ubuntu Linux and want to print a poster using a raster image but the image that you have will have to be split into several "pieces" before printing (which you can "attach" later of course), then PosteRazor is an extremely simple yet a very useful tool built for that exact purpose.
Its an cross-platform opesource application thus not only in GNU/Linux but you can use it in MS Windows and Mac OSX as well. Once installed youll have to load your image file and then follow its "5-step" process and then itll split your raster image and create a PDF file by using which you can easily print your poster since each page in the PDF contains a "cut" of the original image.
Main features...

*. Its written in the FLTK tool-kit thus uses its own "theming" which doesnt integrate that well under Gnome nor Qt/KDE... but as soon as it gets the job done, who cares!.
*. Once loaded, itll display information such as the raster image resolution, DPI, size and color type.
*. Supports a huge list of raster images such as: BMP, DDS, Dr. Halo, GIF, ICO, IFF, JBIG, JPEG/JIF, KOALA, LBM, Kodak PhotoCD, PCX, PBM, PGM, PNG, PPM, PhotoShop PSD, Sun RAS, TARGA, TIFF, WBMP, XBM, XPM.
*. A five step wizard type process is involved which lets you: Change the PDF pages size (A4, letter, Tabloid, etc), overlap settings, image splitting, etc.
Well, thats about it actually. When done all that, you can save the split raster image into a PDF which can be sent into printing later.
You can install PosteRazor in Ubuntu 11.04 Natty Narwhal, 11.10, 10.10 and 10.04 by using the below command in your Terminal window.
sudo apt-get install posterazor
Thats it. Good luck.
Available link for download
Wednesday, November 23, 2016
INSTALASI 3 SISTEM OPERASI DALAM 1 PC Windows xp seven dan Linux Ubuntu
INSTALASI 3 SISTEM OPERASI DALAM 1 PC Windows xp seven dan Linux Ubuntu
Ehm ehm.. Ketemu lagi neh.. Apa kabar sahabat semuanya ? Kali neh ku mau ceritakan tentang pengalaman install 3 OS dalam 1 kompi. Yaitu windows 7, xp dan ubuntu.
Semuanya pasti da pada tau os tersebut.. Hehehe..
Oke deh, lets do it..
Untu melakukan hal tersebut install terlebih dahulu windows xp lalu win 7. Lho kok gitu? Hal ini dilakukan dengan alasan efisiensi. Karna apabila kita install win 7 kemudian xp, maka grub loader win 7 akan hilang tertimpa oleh xp, dan untuk mengembalikan grub loader tersebut, harus menggunakan program tambahan lagi, setelah itu win 7 nya di repair. Kan repot jadinya kalau kayak gitu. 2x pengerjaan.
Jadi solusinya, install win xp duluan, kemudian pada saat pembagian partisi, di buat menjadi 3 partisi. Yaitu C D dan E.
Install kan xp di partisi C, dan setelah instalasi selesai, lanjut ke instalasi win 7.
Prosedur instalasi dilakukan seperti biasa. Hanya saja instalasi dilakukan di partisi D. Tenang aja, grub loader xp tidak akan hilang oleh 7..
Naaah.. Setelah selesai., maka nantinya akan ada 2 grub loader yaitu windows earlier version ( xp ) dan win 7..
Dan tahap terakhir adalah install ubuntu nya..
Instalasi di lakukan di dalam windows nya aja menggunakan wubi. Semudah menginstall aplikasi biasa pada windows..
Dan akhirnya..
Selamat deh.. Kamu punya 3 OS dalam kompi ente..
Maaf bila terdapat kesalahan...
By : agus wiana.
Available link for download
Saturday, October 22, 2016
Industry leading App Photomatix HDR Is Now Available on Linux
Industry leading App Photomatix HDR Is Now Available on Linux

Available link for download
Thursday, October 20, 2016
Install File deb di Linux
Install File deb di Linux
- Masuk melalu terminal atau Ctrl +Alt + T
- letakkan folder/file desktop
- $ sudo dpkg -i namafile.deb atau sudo dpkg -i *.deb
- masukkan password root
- tunggu proses instalasi hingga selesai.
Available link for download