Thursday, March 23, 2017
How to remove unwanted items from your add or remove window
How to remove unwanted items from your add or remove window
 Add or remove window
 It is the window where you can see all the details of any softwares installed on your system,if you unistall any softwares from here ,only proper unistall will remove all registry keys associated with it and its its name from the add or remove window.Incase any errors occurs during your uninstall process ,its name and its subkeys in the registry will stay as it is and can no longer be able to reomove from add or remove window.but you can delete it using your registry ,here goes the steps
Run the Registry Editor (REGEDIT)
Open
HKEY_LOCAL_MACHINE SOFTWARE Microsoft Windows CurrentVersion Uninstall
and remove any unwanted subkeys under "Uninstall."
This will remove any previously failed unistall operations
Available link for download
Tuesday, March 21, 2017
Instant Bluestacks from PacktPub com
Instant Bluestacks from PacktPub com

Figure 1: Instant Bluestacks book cover.
There are a lot of good articles and tutorials related to Android available out there in the wild world of Web. However, I mostly amazed with the job well-done by the Packt Publishing team in producing great technology books.
I do love the idea of Bluestacks Android Player because Windows and Mac users could play vast amount of FREE yet high quality games in Google Play Store without having to switch to Android device. It cannot be denied that Bluestacks is great, however the installation and first-time setup is quiet challenging. This is where the Instant Bluestacks comes handy. With lots of screenshots and step-by-step instruction, this book is very helpful to early adopter of Android ecosystem.
Reader will be guided step-by-step to download, install and set the Bluestacks Android Player both in PC and Mac. Than it demonstrate how to search for some good apps available from Google Play (and some alternative apps download centres) and install them. You will also be advised some troubles shooting techniques in case you have difficulties in using Bluestacks. If you are a developer, you will surely love the tips on how to test run your beautiful app in the Bluestacks.
The book is available from the PacktPub library or Amazon.

Figure 1: Instant Bluestacks sample page.
Available link for download
Saturday, March 11, 2017
Installing Hacking From Linux
Installing Hacking From Linux
All you people that thought you were good hackers, because you could fool
dumb sysadmins, and do a bit of social engineering, or hack something by
following someones carefully prepared text file. Well youre about to get
fucked if you read this text file you will find out that you are a hacker
but, the only thing you can do is use someone elses ideas. So with that in
mind here goes.
I wrote this text file because i know a lot of people who could
benefit from learning to use linux, especially when hacking.
First of all you need to get linux installed on your system so goto
http://www.redhat.com I would suggest you invest $40 in buying the newest
version of RedHat linux this way you will get all the files you want/need
on one cd. If you have a problem with paying that price, then contact me
and i will ship you a copy for half that price, yes only $20! If you are
really cheap (like me :-) you could try and download it, i have gotten it
to work before but its really not worth the wait, i spent a total download
time of about 3 days to download all the files i wanted, and if one of the
files dosnt work, well youre pretty much fucked. Whatever you decide to
do, weather its purchasing a copy from me or from redhat.com, or being
cheap :-) and downloading it, you should read the linux documentation
project especially the installation part, it will save you hours of worry.
I will touch down very briefly on what you have to do to install linux, but
not nearly enough for you to understand the installation. Many people will
tell you not to buy RedHat products because theyre full of bugs, this is
true, and I couldnt agree more, but the bugs are present if youre trying
to hack teh box, so in this case just get RedHat Linux, since its by far
the most user friendly and the easiest to install. On the other hand if you
are intending to run a sophisticated webserver do NOT get redhat, get
something like slackware, or debian linux.
If you are planning to use linux to access the net etc... you will
need to read the FAQ on compatability at http://www.redhat.com, i currently
dont know of any distribution of linux that supports winmodem or any other
type of modem that uses windows software to speed it up, these modems are
generally those yukky U.S robotics modems.
From now on Im assuming you either purchased RedHat linux from me
or from RedHat. O.K lets get started, you will need to partition your
harddrive, to do this goto dos and type in fdisk choose no. 4 to view current
partitions. If you have one large partition that fills your whole harddrive
just reserved for windows then once again youre fucked. You need to back up
all your shit, before performing the steps below. Once everything is backed
up go to dos yet again and type 8in fdisk, now you need to delete your
current partition and set a new primary partition the primary partition
should not fill your whole harddrive, leave as much space as you want
unpartitioned, this unpartitioned space is what youre going to be putting
linux on. So now thats done restore your old windows shit and make sure
everything is working nice and dandy. Now pop in your redhat cd in your
cd-rom drive, and reboot your system. Follow the instructions until you
get to a screen that asks if you wish to use fdisk or disk druid to partition
your harddrive, just choose disk druid, now you need to set up a native linux
partition i recommdn 500 megs, but if you wanna be fancy put about 800 megs.
Now after you have assighned a native linux partition and labeled it / Then
you need to assighn swap space, assighn as much as you see fit mine is about
55 megs. It is also a good idea to label your dos partition i label mine
/dos this is so i can access files in my dos partition while using linux.
Once that is done click on OK and save the partition tables, when you get to
the place where you choose what to install. If you have a partition thats
more than 600 MB then choose the install everything option at the bottom of
the list, if your partition is below 600 MB, then choose everything on the
list except the install everything option. If by some chance you just want
a very basic setup, this is what i used to run, just choose x-windows, DNS
Nameserver, Dial-UP workstation,c++ development, and c development. This
will give you everything youneed to compile programs in ,linux, connect to
your ISP, run x-windows etc....
X-Windows is a graphical interface for linux its very very nice
its kinda like windows 95 but it dosnt suck as much, by the way I will be
refeering to windows 95 as winblows, for obvious reasons :-).
Once everything is installed, it will tr to sonfigure x-windows for
you, this is where it actually helps if you know every little chip in your
system, if you dont well tehn just guess, but whatever you do dont install
Metro-X, just install XFree86 x-server its better, well after all that shit
you will need to install LILO, LILO is a boot manager it allows you to boot
into dos, linux and whatever other O/Ss you may have lying around in yuor
system, once all that is set up, you will be asked if you wish to install a
printer or not, figure that part out yourself, its pretty straight forward,
so Im not gonna waste my time. I wouldnt recommend configuring a LAN
unless you know your shit about linux.
So once setup is finished , your system will reboot. WOA you just
installed linux and youre still alive its amazing isnt it. So now you
should be faced with a prompt that says LILO Boot:
you can now press tab for options this will show which operating systems you
can boot into. You should ahve the following two choices dos and linux, now
since this text file covers linux you would want to boot into linux so at
the LILO prompt type in linux or simply press return, since linux is your
default operating system. Now you should see a bunch of services starting,
this indicates that linux is loading.
When you reach the login prompt type in root and use the password
you specefied for the setup program earlier. Finally you have redhat linux
installed on your system, and hopefully youre still alive, youre still
with me RIGHT!!!!! O.K so you have logged in as root, first thing you want
to do us shadow your password file I always do thsi because then at least i
know a little clueless newbie could never get in my system, to do this type
in pwconv. Well thats all you have to do, to me its a shock that there are
so many unshadowed systems on the net when its so easy to shadow the
password file, but i guess ignorance is the satan of all gods people. Well
i guess youre like dying to show your friends how k-rad and elite you are,
so I guess well better geton to setting up linux to use the net, in other
words to dial out to your ISP. O.K heres how you do it. When youre at the
prompt type in startx this will start up x-windows. Once x-windows is
started, you should see an interface much like windows 95, to the left
should be a box named control panel, in the center you should see a window
named local-host, this is simply the rootshell just like the one you get
when you login. Now to get the modem set up, in the control panel there
should be a lot of small icons, goto the 6th one down (modem configuration)
choose what com port your modem is on, if you dont know choose SOM 1 it
seems to be the default in most computers in gateways i do believe its
COM 2, once thats done, goto the 5th icon down in the control panel
(network configuration)and click it, now choose interfaces then goto add,
choose ppp as your interface type. Put in your ISPs phone number, and
your login and password. Then choose customize, click on networking and
click on activate interface at boot time, once this is done goto done and
choose to save the configuration. Well thats it simply reboot by typing in
reboot and listen to your sweet modems music.
Now that youre connected to your ISP lets go do some surfing, once
youre in x-windows, goto start/applications and click on Netscape Navigator.
Visit http://www.rootshell.com and run a search for scan, once youre
confronted with the search results, go down and find the file named
xenolith.tgz download that file. This is a neat little scanner that scans
sites for volunerabilities, and Im basiacly gonna give you a lesson in
uncompressing files in linux. Once the file is downloaded goto the dir in
which it resides. Since its a .tgz file we would uncompress it using the
following method. Type in gunzip -d xenolith.tgz this will give you
xenolith.tar then type in gzip xenolith.tgz this gives you xenolith.tar.gz
then type in zcat xenolith.tar.gz | tar xvf - . This will give you a dir
called xenolith just cd xenolith and read the README files for installation
instructions. I just thought i would include something on uncompressing
files because many people ask me for help on the topic.
Well Im getting to the place where I have to think about what i
want to put in this text file, well heres something I will include, a
section with some useful command, so here goes. To shutdown your computer
type in shutdown -h now (your message) to reboot simply type reboot. To
compile use gcc filename.c -o filename. To talk to a user type in write
username then on the next line write your message, if you dont want people
to send you messages type in mesg n. Well i sure hop this guide helped you
through getting linux installed if you want to read books on linux and
youre cheap like me goto http://www.mcp.com and sighn up for their personal
bookshelf, and get reading tons of books for free, its a hackers dream and
all time paradise.
Now just as you thought it was over Im gonna show you a few hacking
tricks from linux not really how to hack just some useful commands, so here
goes. To telnet to a site type in telnet www.victim.com ,to telnet toa
site on a specific port type in telnet www.victim.com portnumbe. Lets say
i wanted to telnet to port 25 i would type in telnet www.victim.com 25 .
To FTP to a machine type in ftp www.victim.com. To rlogin to a machine,
many of you proably dont know what the hell im talking about so let me
explain. If you place a file called .rhosts in someones home directory and
that file has two plusses like this + + in it you can use the rlogin command
to log into the system using that account without a password. Ring a bell
in your mind? filling with fresh ideas. I use this method whenever I geta
shell account, it assures me that if they by any chance change the passowrd
I can always rlogin into the system assuming that the account has a .rhosts
file in it and the file contains + + then youre in good shape. Assume the
username of the account is lamer. So inorder to rlogin into lamers account
we would do the follwoing. Type in rlogin www.victim.com -l lamer . This
will telnet us directly into lamers account where we can start rooting the
system.
Well my hand hurts from typing too much, so Im gonna stop typing,
please if you have any questions, suggestions, or comments, e-mail them to
ameister@vol.com. Also i nee some suggestions on what to write text files
about so please e-mail me, it would be greatly appreciated. Me and some
friends are going to be making a magazine with lots of text files and other
interesting hacking material, if you would like a copy e-mail me for more
info, the price should be no mroe than $4 Shipping & Handling included.
http://www.vol.com/~ameister
Available link for download
Tuesday, February 28, 2017
Install Windows 7 From USB Drive
Install Windows 7 From USB Drive
Requirements:
(1) Memory Stick ????????? 4GHz ?????? ????????????
(2) ??????????????? Windows 7 (or) Windows Vista ???????? ???????? ?????????????????????
(3) Memory Stick ??? ???????????? USB Port ???? ??????????????
(4) ????????? Keyboard ?? Windows Key + R ??? ????????????? Run ??? ?????????????
(5) Run box ?????? cmd ?? ?????????? Enter key ??? ?????????????
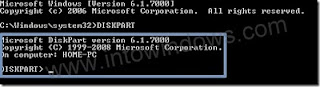
(6) Command Prompt ?????? DISKPART ?? ????????? ????????????????? ?????????????? ???????? ??????????????
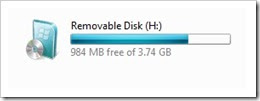
(7) ????????? LIST DISK ?? ???????????? ?????????????? ???????????????????? ???? Memory Stick ??? Size ???????????????? ???????? ????????????????? Disk 0 ??? 298 GB ????????? Disk 1 ??? 3836 MB ???????? ??????????? ?????????????????? ????????? Memory Stick Size ??? Disk 1 ??? ????????????????????
????? ??????? Drive (?)?? ????????? Disk 2 ?? ???????????????? ????????? Hard Disk ????????? ??????????? ????????? ???????????????????? ??????????? Drive Letter ??????????????? ????????? ????? Drive ??? Partition Table (MBR) ????????? Drive Letter ???? ???????????????????????? ??????????? ???????? ????????????????? ?????????????? :)
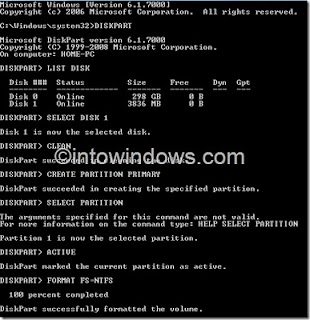 ????????? ?????????????? ????????????????????
SELECT DISK 1
CLEAN
CREATE PARTITION PRIMARY
SELECT PARTITION 1
ACTIVE
FORMAT FS=NTFS
(Format ??????? ?????????????? ??????????????????)ASSIGN
EXIT
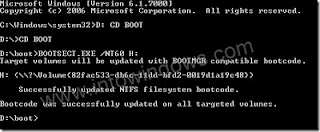
Command Prompt ?? ??????????????? Minize ??????????????? ????????? Windows 7 (????) Vista ?????? ???? DVD Drive ?????? ??????????????? ???? Drive ??? Drive Letter ??? ???????????????????? ??? ????????????? ????? ??????????????? CD Drive ??? (D:) ?? ???????????? USB Drive Letter ??????? (H:) ???? ???????????????????????????????? Command Prompt ??? ??????????????????-
D: CD BOOT
?? ???????????? ( D: ????????? ?????????? DVD Drive ???????????? location ??? ???????????)
CD BOOT
?? ????????????????????? ???????? ?????????????? message ??????? ?????????????????????? ?????????
BOOTSECT.EXE /NT60 H:
?? ????????????????????? USB Drive ????? BOOTMGR ??? ????????????? command ??????????
(H: ????????? ??????? Memory Stick ??? ?????????????????)
???????? Windows7 ?????? File ?????????? Copy ?????? Memory Stick ?????????? ??????????????? ????????? ?????????????????????? USB Bootable, Windows 7 Version Stick ?????? ????????????????? ????? ??????????????????
Source of : http://www.intowindows.com/
Available link for download
Saturday, December 24, 2016
How to remove recycle bin from desktop
How to remove recycle bin from desktop
 Recycle Bin is the area for temporary storage of deleted files.It is also for a security purpose for restoring accidently deleted files.Normally it appears on the desktop for quick access.But i have seen many people who dont want to put these type of icons in the desktop.If you are one of them,here is the trick to remove it from desktop
First Go to START > RUN ( or window + r )
Type GPEDIT.MSC
USER CONFIGURATION >ADMINISTRATIVE TEMPLATES >Click on DESKTOP
On the right hand pane find ” Remove Recycle Bin icon on the desktop ” , double left click on it to ENABLE it.you are done
There is another trick to do this by editing your registry
Create or modify the following registry entry
HKEY_CURRENT_USERSoftwareMicrosoftWindowsCurrentVersionExplorerHideDesktopIconsNewStartPanel
{645FF040-5081-101B-9F08-00AA002F954E}
REG_DWORD
Either way will work fine
Available link for download
Saturday, December 3, 2016
How to Remove Google Images Frame From Your BlogSpot Blog
How to Remove Google Images Frame From Your BlogSpot Blog
Gimana,keren gak judulnya. .
mohon maaf para master,cuma mau share pengalaman saja. Kalo emang repost didelete juga gakpapa,asal jangan dibanned. .
awal masalah berasal dari screenshot ini:
hampir 90 persen pengunjung blog saya datangnya dari google image,dan tiap pengunjung dapet imagenya . . kan kehalang sama google frame image tuh,udah dapat gambarnya langsung main close aja. . kasihan iklan adsense saya. .
setelah semalam googling sana sini sampe pulsa abis,akhirnya nemu juga buat pemecahannya. Silahkan pasang script dibawah ini diatas kode </head>
if (top.location != self.location) top.location = self.location;
</scr!pt>
habis itu jangan lupa simpan. .
kalo udah disimpan silahkan ditest di result image search blogspot agan. Saat script ini aktif,google frame akan muncul beberapa detik. Habis itu akan diredirect ke blog agan.
selamat mencoba dan mohon maaf kalo agak kacau .
thanks to _http://www.bloggerafif.com/2011/02/remove-frame-google-image.html (bukan punya saya)
kalo bermanfaat jangan lupa likenya. .
update,trik ini juga bisa untuk wordpress selfhosting (thanks to om gembel-intelek yang udah koreksi) caranya sama,tinggal pasang kode itu diatas kode di header.php . Kalo mau yang otomatis silahkan cicipi pluginnya ,silahkan download di _http://wordpress.org/extend/plugins/wp-frame-breaker/
Source : How to Remove Google Images Frame From Your BlogSpot Blog
Available link for download
Sunday, November 20, 2016
How to write protect usb drives from other users
How to write protect usb drives from other users
1. First thing you have to do is to open run ( window + r ) and type regedit
2. Now browse to the following section from your registry window
HKEY_LOCAL_MACHINESYSTEMCurrentControlSetControl
3. Make sure that you are in above specified path, then right click and add a new key and enter
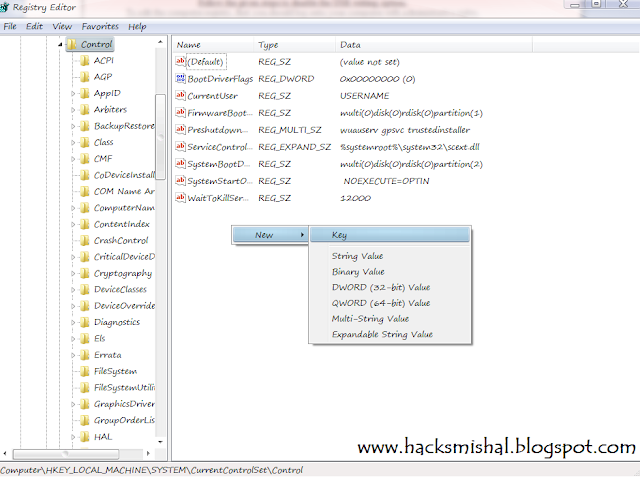
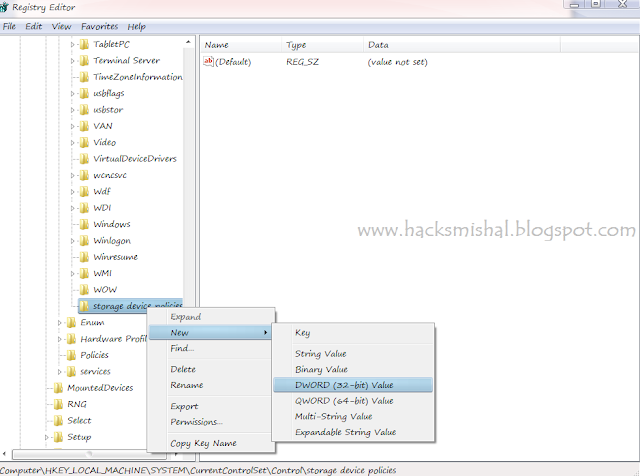
Restart your computer to take effect.
Thats it you are done.Now all the USB Ports in your system is protected and no one can copy anything through usb.
If you like this post please pass your comments on this.All your feedbacks and advices are precious.
Available link for download
Monday, November 14, 2016
How to remove the Thumb db File From your Hard Drive
How to remove the Thumb db File From your Hard Drive
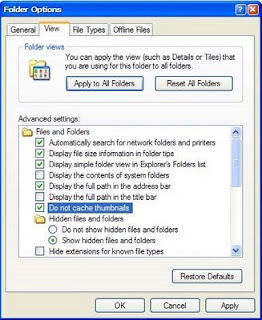
Windows directory ????????? Thumb ??????????? Thumbnail Pictures ??????? ???????????????? ?????????????? Thumbnail Picture ???????? ???????????? (????) document ???????? ?????????? ???????? ???????????? ????????? ??????????????? ?????????? Graphic (????) D.T.P ???????????? ??????? ???????? ???????????????? ?????????? ???????????????? ??????????? ???????????? ???????????? ?????????? Thumbnail View ???????????????????? Thumb ??????????? ?????????????? ???????????? ??????????? ?????????????? ???????????????? Thumb ??????????? File Size ???????? ???????? ??????????????????????? ???????????? ???????????????????????????? ????????? ??????? ?????????? ??????? ??????????????????? ????????? Thumbs.db ????????? ??????? ???????? ?????????? ????????????????? ???????? ????????? ??????????? ???????????????? ? ????? ???? ???????????????...
(1) Desktop ?????? My Computer ??? double click ????????? Open ???????
(2) Tools ?????? Folder Option ??? Click ????????
(3) ????????? View Tab ??? Click ????????
????????? Thumb ???????????? ?????????? ???????????????..
(1) Start ??? Click ????????? Search ??????? ????????? Click ????????????????????
(2) File ??????? ?????????????? All files and Folders ??? ???????????
(3) ?????????????? ???????????????? thumbs.db ???? ????????????? ?????????????????
(4) ????????? Start ??? Click ????????? Run ??? ?????????? Text box ?????? %temp% ??? ????????????????? ?????????????????????? ???????? %temp% ?????????????? ???????????? ???????????
Available link for download
Sunday, October 23, 2016
Introducing the Biggest Hair Trend From Spring Couture and How to Pull It Off
Introducing the Biggest Hair Trend From Spring Couture and How to Pull It Off
.jpg) |
| © Daniel Jackson |
%2B(2).jpg) |
| © Provided by Allure |
Available link for download
Saturday, October 15, 2016
How To Upgrade to Gingerbread After Rooting and Removing Crapware From Your Droid X
How To Upgrade to Gingerbread After Rooting and Removing Crapware From Your Droid X
About 6 months ago I set out on a quest to root my Droid X (running FroYo) in order to remove/disable unwanted apps like CityID, BlockBuster, VZ Navigator, etc. While that was very successful, it did impede my ability to update to the much desired Gingerbread. While I consider myself smart and quite educated in the ways of technology (Ive made a decent living in the IT field for 20 years) I have really struggled to figure this out & its frustrated me greatly. There are a number of forums which discuss what to do and how to do it, but they almost always throw out terms which the lay person (with respect to Android OS in particular) wont understand or instructions that are written in short hand. While this may be fine for those "in the know," its not fine for the rest of us. So after pulling my hair out several evenings and weekends recently and reading a ton of stuff, I believed I finally stitched it all together enough to have upgraded my rooted Droid X to Gingerbread - but wait, there was a problem.....
Ill address that problem later (perhaps even in another post), but suffice it to say that although my Droid X reported it was on the latest and greatest Android OS, Gingerbread (AKA 4.5.596) it would often tell me there was an update available, and display the message, "Info. Download of update failed." This has finally gotten to me and Im in the process of correcting it, writing this as I progress with correcting this.
Here are the basic steps, then Ill expound on each.
- Backup data (and apps)
- SBF back to stock FroYo
- Verizon OTA update to Gingerbread
- Restore data (and apps)
NOTE: There are a few gotchas and things to watch out for, so please read and follow these instructions carefully. For example at various points your phone may not start or the battery wont charge, but these things are addressed in the instructions.
NOTE: Make sure your battery is full or as close as possible before proceeding as it can take a while (30 minutes or more) and the battery doesnt charge during most of these steps.
- Connect your Droid via USB cable.
- Launch RSD Lite.
- Reboot Droid into Boot Loader (pull battery, or use power button to turn off; hold volume down and camera buttons, and press & release power button - continue holding volume down and camera buttons until triangle with exclamation point icon appears). Once Droid is in boot loader it should be listed as an available device in RSD Lite. The Droids bootloader screen looks something like this:
Bootloader
2C.5C
Battery OK
OK to Program
Transfer Mode:
USB
- In RSD Lite select the device (Droid) and browse to the SBF file downloaded previously, then press Start.
- Sit back and let RSD Lite do its thing.

After RSD Lite is done the Droid will restart, however you will likely just get to the animated red Droid Eye, sit there for a couple minutes & reboot over and over again. At this point you need to wipe the phone, and since you have a good backup it shouldnt be too painful... Right.!? To wipe the phone power it off (have to pull the battery), then press and hold the home button and power button (you can let the power button go after a couple seconds, but must continue to hold the home button). This will take you to the Android system recovery utility. Next, press both up/down volume buttons at the same time to display the menu, then press the down volume button to select "wipe data/factory reset" and press the camera button. You will be presented with at least one warning that you will lose all data, but since you have it backed up you should feel pretty good about proceeding.
NOTE: While in the Android system recovery utility you will also want to "wipe cache partition" as not doing so may cause your battery not to charge after completing these steps.
Finally, reboot the system.
After the phone boots you will have to follow the prompts to activate the phone with Verizon.
Step 3 - Droid X OTA Update
This is perhaps the easiest part - doing a standard OTA update. On the phone go to Setting, About Phone, System Updates and download the Gingerbread (4.5.596) update. Once downloaded install it.

And, success....

Step 4 - Restore Data & Apps
Go to the Android Market and install your backup software (in my case its MyBackup), then restore your data and apps.
NOTE: after the OTA update to Gingerbread my Droid wouldnt actually charge, although it said it was charging. In an earlier step I addressed wiping the cache partition - which did the trick when I had this problem previously. At this point I was a bit concerned, but a simple battery pull corrected the issue and its working great now.
Happy Androiding with Gingerbread on your Droid X.... Oh, and stay tuned as I will definitely post detailed instructions on how to remove the crapware (CityID, Blockbuster, VZ Navigator, etc.) from Gingerbread soon as I figure it out.
Available link for download