Showing posts with label ubuntu. Show all posts
Showing posts with label ubuntu. Show all posts
Friday, April 21, 2017
How to Run Ubuntu 11 04 Natty Narwhal Unity in Acer Aspire One 722 Netbook
How to Run Ubuntu 11 04 Natty Narwhal Unity in Acer Aspire One 722 Netbook
Few days ago suddenly out of nowhere the Acer Aspire one 722 (BZ454 to be precise) fell into my hands :P. It came pre-loaded with MS Windows 7 Home Premium (64-bit). But as soon as I got it, I just wanted to try Ubuntu Linux 11.04 in it (obviously). Since, it doesnt have an optical drive, I went with creating a Live Ubuntu USB disk but it did not work!.
Oh it boot the OS alright ... but after displaying the pretty Ubuntu logo, bugger just freezed!. I then search in few forums and realized that others are also having the same issue. I honestly dont know what really is the issue here... but for some reason it just freezes the whole screen.
I also had a bit similar issue with my now old Laptop while I was trying Ubuntu 11.04 using the LiveCD but was able to fix it by first not choosing to run Ubuntu as a live environment but went for the installation straight ahead.
 |
| Dudes, I really got in running! :D... |
This time I saw the Wi-Fi card is turned on automatically thus I guessed that it might be the Wi-Fi detection problem which is pretty common with GNU/Linux these days.
Anyhow, just out of curiosity, I decided to give it a try, again, and this time, when the USB boot-menu was loaded, I pressed the "F6" button and chose "ACIP-Off" option. The system booted but when it arrived where previously freeze-d, this time I got an error message (except for the stuck-non-informative window as with previous occasions) saying that the installer cannot find a live file-system to operate.
Now, Im not an expert on how GNU/Linux Live "environments" work. But when I was creating my Boot-able USB disk I choose the option that says "Discarded on shutdown, unless you save them elsewhere".
 |
| the second option is not selected by default... but I guess most of us just use it thus this is where I made my mistake (at lest I thin this is the reason) |
 |
| Just make sure that youve chosen this one (selected by default)... |
But to be honest, even after considering the power of the included AMD Radeon HD 6250 (256MB dedicated graphics memory, 280Ghz internal clock speed if Im not mistaken) Unity does feel a little slow since the proprietary AMD/ATI drivers are significantly faster than the open-source drivers, you should install the proprietary drivers if you want the best possible performance out of that GPU.
And also, if you also have this Netbook, then it should be pretty interesting what the upcoming Ubuntu 11.10 could bring from a performance point of view because with 11.10, Canonical is shipping the Kernel 3.0 for the first-time which fully supports the AMD Fusion architecture by default.
Anyhow, the performance even while on the Live USB environment is really good (Im even writing this post in it!) but it should be even better after installing in the HDD.
So, if youre having troubles with trying to run Ubuntu 11.04 Natty Narwhal in Acer Aspire One 722 Netbook, then while creating that USB disk, just try the default settings as shown in the third screenshot. Good luck.
Oh and one more thing, the 11.6 inch display has a a resolution of 1366x768 thus things could look a bit too small for some but thanks to the Ubuntu or the Gnome desktops DPI settings, I think Ubuntu Linux looks + makes things slightly bigger than the original MS Windows 7 thus Ubuntu is certainly my preferred choice while using this Netbook.
Available link for download
Tuesday, March 7, 2017
install apt fast di Ubuntu
install apt fast di Ubuntu
[laelamadjnun.info]-install apt-fast di Ubuntu, apt-fast merupakan aplikasi download sama halnya dengan apt-get akan tetapi apt-fast ini mempunya kelebihan dari pendahulunya karena apt fast menggunakan lebih dari 1 port untuk proses downloadnya berbeda dengan apt-get hanya 1 port, ilustrasinya begini, ada dua setadion bola yang 1 pintunya hanya 1 buah dan yang ke 2 pintunya ada 8 buah ketika ketika penonton dari luar yang jumlahnya ribuan mau masuk kira-kira lebih cepat yang ke 1 atau yang 2, seharusnya sih yang ke 2 karena pintu masuknya ada 8 dan penonton bisa masuk dari salah satu dari 8 pintu tersebut sedangkan yang ke 1 semua melalui pintu utama bagaimana pasti memakan waktu lama supaya penonton bisa masuk semua, begitu juga dengan apt-get dan apt-fast, apt-fast lebih cepat dari pada apt-get karena mengunakan lebih dari 1 pintu masuk, dibawah ini merupakan langkah-langkah untuk proses instalasinya.
sudo add-apt-repository ppa:tldm217/tahutek.net
2. lakukan update
sudo apt-get update
3. install apt-fast nya
sudo apt-get install apt-fast
Tunggu sampai proses instalasi selesai, setelah proses instalasi selesai silahkan coba dengan perintah berikut apt-fast install [nama pekat aplikasi]
mungkin begitu saja tutorial untuk menginstall apt-fast nya semoga tutorial ini menambah pengetahuan kita tentang dunia linux
Status : Dokumentasi newbye
Available link for download
Sunday, March 5, 2017
Install LXDE di Ubuntu
Install LXDE di Ubuntu
[laelamadjnun.info]-Install XDE di Ubuntu, LXDE, Lightweight X11 Desktop Environment, adalah sebuah lingkungan desktop yang ringan dan cepat. LXDE dirancang agar ramah bagi pengguna dan desainnya ramping, ini untu menjaga agar penggunaan sumber daya tetap rendah. LXDE menggunakan RAM dan CPU berkemampuan rendah namun tetap kaya fitur sistem operasi. Karena penggunaan sumber daya yang rendah inilah yang membuat LXDE hemat energi. Kami tidak mengintegrasikan setiap komponen LXDE sepenuhnya. Sebaliknya, kami mencoba membuat agar semua komponen bebas, sehingga setiap komponen dapat digunakan secara bebas dengan sedikit ketergantungan. Hal ini membuat porting LXDE ke distribusi Linux dan sistem Unix yang berbeda lebih mudah(http://id.wikipedia.org).
berangakat dari deskripsi diatas lebih mudahnya kita langung praktek saja :
1. buka terminal lalu ketikan printah dibawah ini:
sudo add-apt-repository ppa:lxde/ppa (enter n masukan password user kamu)2. lalu update dengan printah
sudo apt-get update
3. Baru install dengan printah
sudo apt-get install lxde
4. Selesai
tinggal menggunakanya
Setelah sukses menginstal anda logout dari session gnome.
* Klik pada account pengguna Anda
* Pilih LXDE dari seesion di panel bawah sebelum Anda memasukkan password Anda.
lihat gambar :

Untuk Unistall
buka terminal lalu ketikan printah dibawah ini
sudo apt-get autoremove lxdeBila terjadi problem pada werless penyelesaianya sbb:
sudo nano /etc/xdg/lxsession/LXDE/autostart
Tambahkan baris berikut untuk mengaktifkan fitur werless untuk pengguna:
@nm-applet
Selamat Mencoba...... semoga bisa bermanfaat buat anda -------> Salam NGOPREX
Status : Dokumentasi
Available link for download
Friday, January 27, 2017
INSTALL DAN KONFIGURASI WEBMAIL DENGAN SQUIRRELMAIL DI UBUNTU 10 10
INSTALL DAN KONFIGURASI WEBMAIL DENGAN SQUIRRELMAIL DI UBUNTU 10 10
Hmmmmmmmm... rasanya uda lama banget gak lihat neh blog, bisa jadi goBlog neh, eheheheehe.. dilanda kesibukan dengan kebosanan yang tak henti-henti.. Oke deh,, langsung aja neh.. Kali neh akan dibahas tentang webmail, yaitu mulai cara install dan konfigurasi nya. PAda kali neh melalui mesin ubuntu maverick. Pembahasan ini lanjutan dari pembuatan domain waktu lalu. Mungkin neh pembahasan yang basi alias jadul gitu. SEperti biasa bagi yang berminat, ambil ja deh... kagak sempat tu diposting kan, ehehehhe....
:)
maaf bila terdapat kesalahan, thanks buat para master ubuntu dan salam kenal aja.
Available link for download
Monday, January 16, 2017
Installing Google Applications in Ubuntu 8 04 Hardy Heron
Installing Google Applications in Ubuntu 8 04 Hardy Heron
Google has released a number of interesting softwares for Linux platform now because all of these softwares are closed sourced :( and better free open source alternatives are available these packages are not installed by default in most of the popular Linux distributions. Also being closed source means they are not available in Official repositories too. In this article we
Note : All the installation instructions below are for 32 bit processor .
Google Picasa 2.7
Google Picasa is one of the more user friendly photo management software available , it is available on both Windows and Linux . It runs on Linux on top of Application Layer called Wine that allows Windows application to run on Linux . However this has some disadvantage firstly some windows application dont work as well as they do on windows , there are occasional application crashes, application freezes , also UI is bit less responsive however applications are still usable .
With version 2.7 Google Picasa brings a number of interesting features not available in many free open source photo management software available on the Linux platform like integration with the Web Album , improved support for importing images from camera etc .
Now to install Google Picasa launch terminal from (Applications -> Accessories -> Terminal) and issue the following command in the terminal window:
wget http://dl.google.com/linux/deb/pool/non-free/p/picasa/picasa_2.7.3736-15_i386.deb
and
sudo dpkg -i picasa_2.7.3736-15_i386.debAfter completing above step you can launch Google picasa from (Applications -> Other -> Picasa )
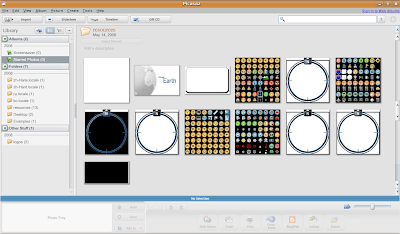 Google Picasa in Action
Google Earth
Google Earth is probably one of the most popular and controversial Google application providing you with satellite view of the world to install Google Earth on your Ubuntu desktop follow the steps below.
Below we are giving link to 4.3 Beta version of google earth so it might be bit unstable if you want a stable version you can download it from this link :
wget http://dl.google.com/earth/client/current/GoogleEarthLinux.bin
and
chmod +x GoogleEarthLinux.bin
and
./GoogleEarthLinux.bin
chmod +x GoogleEarthLinux.bin
and
./GoogleEarthLinux.bin
After issuing the above command you will find a dialog box like this asking for location where to install Google Earth
 After installation is over you can launch Googleearth from (Applications -> Internet -> Google Earth )
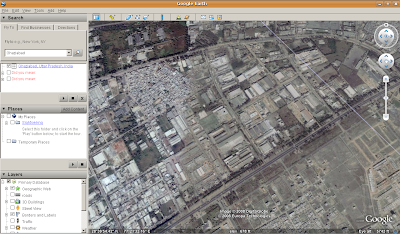 Google Earth in Action
Google Desktop
Google Desktop allows one to full text search of a users e-mail, computer files, music, photos, chat, and Web pages viewed,OpenOffice documents , PDF files and more .Now similar tools already existed on Linux like beagle (supported by Novell ) , meta tracker etc .However Google Desktop search is not based on any of these tools and uses its proprietary algorithms to search for files on the computer. So to install Google Desktop issue the following command in the terminal window:
wget http://dl.google.com/linux/deb/pool/non-free/g/google-desktop-linux/google-desktop-linux_current_i386.deb
and
sudo dpkg -i google-desktop-linux_current_i386.debAfter completing above step you can launch Google Desktop from (Applications -> Google Desktop -> Google Desktop ) initially it will take bit of your computers idle time resources as it indexes files in your computer and creates database of them. You can change setting of Google Desktop from (Applications -> Google Desktop -> Google Desktop Preferences ).
Now once you launch Google Desktop you will see a Google Desktop icon on the top right corner of the menubar at the top as shown in the screenshot below.
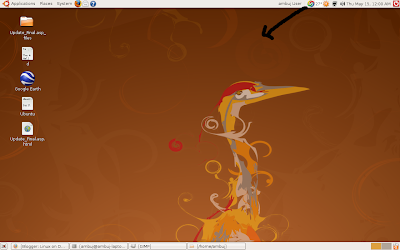
By rightclicking on the icon you can set various preferences , also by double left clicking the icon brings up search box allowing you to search for files among the indexed files.
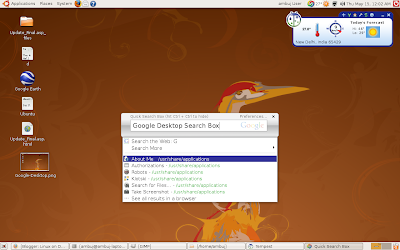 Google Desktop Search box
Article Written by : Ambuj Varshney (blogambuj@gmail.com)
For Desktop on Linux Blog , http://linuxondesktop.blogspot.com
(C) 2008 , Ambuj Varshney
Available link for download
Saturday, January 14, 2017
How to Test Disk Drive Performance benchmarks in Ubuntu
How to Test Disk Drive Performance benchmarks in Ubuntu
A while ago I was quite obsessed with testing hard disk performance. I purchased a HDD those days and it was a , lets called it "A" (I dont wanna create a prejudice since this manufacture has some great products) HDD. Interestingly, one of my friends had a Samsung HDD with the same hardware specifications (RPM, capacity ...) except, the Samsung HDD had like 256Kb or more physical Disk-cache in it.
Now to this day I dont know whether it was the small Cache difference caused it... but I did noticed a little boot time delay (with MS Windows actually). I tested those both HDD in my PC and Samsung always seems to be slightly faster.
Then, since MS Windows doesnt come with a hard drive performance test or a benchmark suite in other words, I used a free utility and it actually showed that the model "A" (theyre both 80GB and IDE ones) was in fact a bit slower!.
 |
| Disk utility that comes with Ubuntu... |
So, all Im just trying to say is that, if you brought a brand-new PC then testing your hard drive performance can come in handy because it lets you compare the drives actual performance with other ones (you can find results of other drives of manufactures online easily) thus you can even ask for a replacement.
Sorry to drag you along this long... but all Im trying to say is that, having a benchmark suite can come quite handy sometimes sine it helps you to go beyond your doubts :). Anyhow, unlike with MS Windows, now if you use Ubuntu as your main OS, then did you know that even without installing any third party utility, Ubuntu has a built in tool that lets you test disk performance with ease?.
Its called Disk Utility and RedHat seems to be the developer so it might be a default app that comes with Gnome classic desktop.
Main features...
*. Test Hard disk performance.
 |
| Remember, you can only perform Write Speed tests with HDD without any file systems on them... |
*. Displays other information such as File systems, partitions and their sizes, capacity, etc.
*. HDD Smart tests.
*. Format, Delete, Edit or Mount/Un-mount file systems.
You can launch this utility by pressing "Alt" + "F2" keys and put the below command and press enter (or go to: "System" -> "Administration" -> "Disk Utility" from your desktop menu as well)
palimpsest
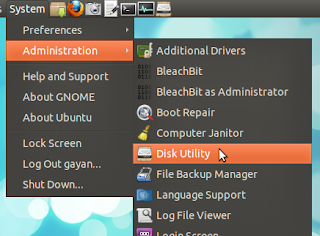
Once the program is loaded, select your HDD or optical drive, etc from the list to your left and then click on the "Benchmark" button to start the tests.
But remember, it has a limitation (oh great timing Gayan! :D). That is, if your HDD is formated and has a partition table on it, then this disk test utility cannot do Write tests. It can only only perform read speed of your HDD.
 |
| It can run your HDDs Smart (Self-Monitoring, Analysis and Reporting Technology) tests too |
But there are quite a few that we can use to do advanced benchmarks in Ubuntu and Ill write about few of em in the future. If you already know about them (Im pretty sure most of you geeks know :P), youre more than welcome to share it with me dudes (+ ladies too ;-)).
Anyhow, if all you want to is just perform a basic HDD read test + access other informations such as Smart feature (which is a special function that displays "warnings" just before your HDD is about to fail so you may have enough time to backup/recover the data, etc) then you dont have to get a separate one because Ubuntu Linux comes with a one of its own and it is certainly a pretty handy utility as far as Im concerned. Good luck.
Available link for download
Tuesday, January 3, 2017
How to Split or Merge Files Easily in Ubuntu
How to Split or Merge Files Easily in Ubuntu
Almost all the popular file compression tools (archive managers) have the ability to split files and then merge them later, which is also the case with Ubuntu. Thanks to the default archive manager (called File-Roller), you can split any file by using it as long as youre using a compression format that supports file splitting (.rar for instance).
But the problem of using A compression container format to split files and store them has a bit of a known risk. I think most would agree that (at least in my experience) some of these split files have a tendency to be corrupted, which is a common "headache" concerning file downloading. For instance, have you ever encountered a "CRC error" while trying to re-merge a file that was split and stored in the .rar compression format?? (errrrrrrrrrr :D).
So, to avoid or minimize these sort of difficulties we need to have a dedicated, specially designed file splitter. Although under MS Windows there a lot of free tools (HJSplit is pretty famous) available so is with GNU/Linux too!.
 |
| Its ridiculously awesome! :D... |
Main features...
*. Split and Merge any file.
*. 2 Times faster than the previous version according its the developers.
*. Even includes a "Wizard" for both splitting or merging.

*. Change file split using size or raw values, location, etc.
*. Use generic algorithms or different methods.
*. MD5 integrity checking.
*. Shows progress with speed, etc.

*. E-mail files afterward.
*. Enable/Disable notifications & few more settings can be accessed via the "Preferences" window.

You can install Gnome Split in Ubuntu 11.04 Natty Narwhal, 11.10 Oneiric Ocelot, 10.10 and 10.04 easily by using its PPA channel. To do that, as usual, open your terminal window and enter the below commands.
sudo add-apt-repository ppa:gnome-split-team/ppaSo, if you want to avoid most of those merging errors + looking for a extremely easy to use, features rich, fast file splitter/jointer (PDF, .PST, multimedia files or anything!) that can be used in Ubuntu (or GNU/Linux in general), then Gnome Split is certainly one of the best out there without a doubt!.
sudo apt-get update
sudo apt-get install gnome-split
Available link for download
Monday, December 26, 2016
How to Split Raster Images to a PDF file in Ubuntu Linux
How to Split Raster Images to a PDF file in Ubuntu Linux
If you Ubuntu Linux and want to print a poster using a raster image but the image that you have will have to be split into several "pieces" before printing (which you can "attach" later of course), then PosteRazor is an extremely simple yet a very useful tool built for that exact purpose.
Its an cross-platform opesource application thus not only in GNU/Linux but you can use it in MS Windows and Mac OSX as well. Once installed youll have to load your image file and then follow its "5-step" process and then itll split your raster image and create a PDF file by using which you can easily print your poster since each page in the PDF contains a "cut" of the original image.
Main features...

*. Its written in the FLTK tool-kit thus uses its own "theming" which doesnt integrate that well under Gnome nor Qt/KDE... but as soon as it gets the job done, who cares!.
*. Once loaded, itll display information such as the raster image resolution, DPI, size and color type.
*. Supports a huge list of raster images such as: BMP, DDS, Dr. Halo, GIF, ICO, IFF, JBIG, JPEG/JIF, KOALA, LBM, Kodak PhotoCD, PCX, PBM, PGM, PNG, PPM, PhotoShop PSD, Sun RAS, TARGA, TIFF, WBMP, XBM, XPM.
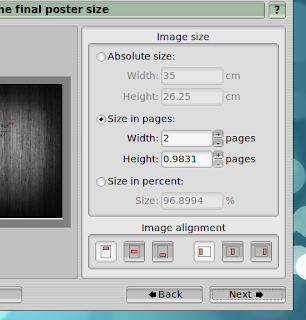
*. A five step wizard type process is involved which lets you: Change the PDF pages size (A4, letter, Tabloid, etc), overlap settings, image splitting, etc.
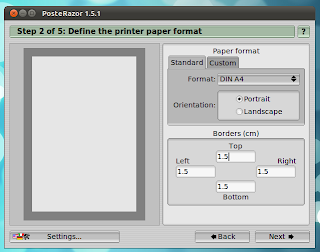
Well, thats about it actually. When done all that, you can save the split raster image into a PDF which can be sent into printing later.
You can install PosteRazor in Ubuntu 11.04 Natty Narwhal, 11.10, 10.10 and 10.04 by using the below command in your Terminal window.
sudo apt-get install posterazor
Thats it. Good luck.
Available link for download
Wednesday, November 23, 2016
INSTALASI 3 SISTEM OPERASI DALAM 1 PC Windows xp seven dan Linux Ubuntu
INSTALASI 3 SISTEM OPERASI DALAM 1 PC Windows xp seven dan Linux Ubuntu
Ehm ehm.. Ketemu lagi neh.. Apa kabar sahabat semuanya ? Kali neh ku mau ceritakan tentang pengalaman install 3 OS dalam 1 kompi. Yaitu windows 7, xp dan ubuntu.
Semuanya pasti da pada tau os tersebut.. Hehehe..
Oke deh, lets do it..
Untu melakukan hal tersebut install terlebih dahulu windows xp lalu win 7. Lho kok gitu? Hal ini dilakukan dengan alasan efisiensi. Karna apabila kita install win 7 kemudian xp, maka grub loader win 7 akan hilang tertimpa oleh xp, dan untuk mengembalikan grub loader tersebut, harus menggunakan program tambahan lagi, setelah itu win 7 nya di repair. Kan repot jadinya kalau kayak gitu. 2x pengerjaan.
Jadi solusinya, install win xp duluan, kemudian pada saat pembagian partisi, di buat menjadi 3 partisi. Yaitu C D dan E.
Install kan xp di partisi C, dan setelah instalasi selesai, lanjut ke instalasi win 7.
Prosedur instalasi dilakukan seperti biasa. Hanya saja instalasi dilakukan di partisi D. Tenang aja, grub loader xp tidak akan hilang oleh 7..
Naaah.. Setelah selesai., maka nantinya akan ada 2 grub loader yaitu windows earlier version ( xp ) dan win 7..
Dan tahap terakhir adalah install ubuntu nya..
Instalasi di lakukan di dalam windows nya aja menggunakan wubi. Semudah menginstall aplikasi biasa pada windows..
Dan akhirnya..
Selamat deh.. Kamu punya 3 OS dalam kompi ente..
Maaf bila terdapat kesalahan...
By : agus wiana.
Available link for download
Friday, November 18, 2016
Install driver Ralink RT3090 di UBUNTU
Install driver Ralink RT3090 di UBUNTU
[laelamadjnun.info]- mungkin Ini pengalamanku dengan ASUS 1015PM yang baru dibeli salah satu teman, dan dia memintaku untuk menginstal os selain widows, dan dengan senang hari saya instal itu laptop dengan ubuntu yang notabenya os lumayan mudah dari keluarga linux dan pastinya open source, pada waktu penginstallan sih takada yang aneh dan tak ada yang error, akan tetapi ketika sudah selesai dan mau terkoneksi ke wirelles, tak ada satupun SSID dari wifi di sekitar kampus yang nyangkut, dan sayapun mulai curiga pasti driver wirelesnya bermasalah, dan sayapun browsing dengan laptop saya yang masih terkoneksi internet, saya singgah di salah satu situs dan ternyata benar ada masalah pada wirelles dengan pabrikan Rallink khususnya tipe RT3090 untuk ubuntu yang saya gunakan yaitu ubuntu 9.10 (Karmik Koala) . berikut ini cara yang saya lakukan untuk mengaktifkan driver wirelles tersebut
1. buka terminal ketik # lspci , maka akan keluar perangkat yang menacap di mainboard laptop kita, ternyata laptop ini menggunakan
RT3090 Wireless 802.11n 1T/1R PCIe2. kunjungi alamat ni https://launchpad.net/~markus-tisoft/+archive/rt3090
kemudian piih ubuntu yang kita gunakan untuk kali ini saya menggunakan ubuntu versi 9.10
3. kemudian ketikan perintah
sudo modprobe rt3090sta untuk auto start
nah kalo abis di update ko ga bisa konek lagi silahkan buka terminal ketik gedit /etc/module
dan sisipkan di paling bawah rt3090sta lalu simpan dan restart maka akan kembali konek...
selesai dah.... selamat online ria......
semoga bisa membantu....
Available link for download
Saturday, November 12, 2016
INSTALL DAN KONFIGRASI DHCP SERVER DI UBUNTU 10 10
INSTALL DAN KONFIGRASI DHCP SERVER DI UBUNTU 10 10
Hmmmmmmmmm... baru dapet ilmu baru neh tentang DHCP, yang selama neh menggunakan DHCP dengan bantuan Wireless Router, kali neh akan dibahas dengan menggunakan operasi linux ubuntu 10.10 dan bagi para master, mungkin artikel ini tidak berguna, jadi ya kluar ja deh, daripada ntar diejek, hmmmmmmmm,, secara teoritis, DHCP digunakan untuk memberikan IP kepada Client secara otomatis. Oke deh langsung aja, sebelumnya maaf neh, gak sempet nulis di blog. Jadi download aja ya... ehehehehehe..
Trimakasih yoooo...
mohon maaf bila ada kesalahan..
Salam Dingin dari agusehmehm..
Available link for download
Saturday, November 5, 2016
Instal Ubuntu Desktop 12 10 Dual Boot Dengan Windows
Instal Ubuntu Desktop 12 10 Dual Boot Dengan Windows
Instal Ubuntu Desktop 12.10 Dual Boot Dengan Windows - Instal Ubuntu Desktop 12.10 Dual Boot Dengan Windows - Selamat siang semuanya, pada share kali ini ane mencoba memberika tutorial sederhana ini tentang instal Ubuntu Desktop, oke langsung aja gan lihat caranya di bawah ini :
1. Setting BIOS agar booting ke bootable Ubuntu 12.10 (Baik Lewat DVD/Flashdisk)
2. kemudian jika berhasil akan tampil seperti ini
2. kemudian jika berhasil akan tampil seperti ini

3. Jika anda ingin mencoba terlebih dahulu ubuntu terbaru ini bisa kalian klik try ubuntu jika memang nanti sudah yakin mau install ubuntu ya, ydah langsung aja deh gak pake lama klik install ubuntu
4. tampil form Preparing to install ubuntu ini kita Continue dan klw kita tidak terkoneksi internet maka kita pilih option yang pertama dan lanjutkan instalasi sampai tampil form instalasi Typ

5. Nah hati-hati pada form ini ada 3 pilihan option,
1. option pertama : jika anda ingin install ubuntu dengan sistem operasi lain pilih option ini
2. option kedua : menghapus sistem operasi yang ada dan menggantinya dengan Ubuntu
3. option ketiga : jika anda pengguna tingkat lanjut maka pilih opsi ini karena kita nanti bisa membagi lagi partisi home,root, dan swap ya (bagi yang baru kenal linux pasti binggung tuh, sama kyak saya juga :D)
6. jika anda memilih option pertama pilih install now dan langkah-langkah yang lainya tinggal next aja pasti jadi tuh ubuntu ya
7. jika anda memilih option ketiga maka disini saya mau jelasin dulu ne apa itu partisi home, root, dan swap
1. Home : partisi home ini sama aja kayak my dokumen ya kalau diwindows tapi partisi ini gak masuk kedalam sistem dia terpisah jika nanti mau diinstal ulang lagi maka data-data kita masih tetep ada mantap kan ...hehe. Cara membuatnya pilih hardisk yang telah kita create di tutorial saya sebelumnya hapus partisi dengan klik tombol -(minus) kemudian buat dengan klik tombol +(plus)


9. Pilih location negara kemudian continue

10. Pilih keyboard layout kemudian continue

11. Isi data user login dan password pilih continue lagi

12. setelah itu instalasi akan berjalan sekitar 15-30 menit tergantung panas api ya..eh kirain masak apa ...hehehe just kiding, klw udah berhasil maka tampil form istalasi complete dan meminta untuk restart

13. oke selesay sudah tutorila ini selamat mencoba ........!!!
Available link for download
Friday, October 21, 2016
Install MySQL Workbench di Ubuntu
Install MySQL Workbench di Ubuntu
[laelamadjnun.blogspot.co.id]-Install MySQL Workbench di Ubuntu, Akhirnya semalan suntuk ngoprek terbayar juga, Install Mysql Workbench walaupun lumayan ribet tidak menggunakan apt-get install [nama paket] sebelum kita kelangkah penginstalan silahkan baca dulu deskripsi dibawah ini :
MySQL Workbench adalah sebuah perangkat aplikasi berbentuk visual yang dipergunakan untuk mengelola basis data. Perangkat aplikasi ini biasa digunakan oleh seorang arsitek basis data, pengembang basis data, serta administator basis data. MySQL Workbench menyediakan model data, pengembangan SQL, dan peralatan administrasi yang komperhensif untuk konfigurasi server basis data, administrasi pengguna, dan masih banyak lagi. MySQL Workbench tersedia pada platform Windows, Linux dan Mac OS.
Kemudian langkah instalasinya sebagai berikut
1. download dulu file .deb nya disini jangan lupa cari yang sesuai dengan versi ubuntu kamu ane
pake si karmic (ubuntu 9.10) dan prosesor intel jadi ane gunakan ini gan
mysql-workbench-oss_5.2.16-1ubu910_i386.deb
2. nah kalo sudah di lokalkan di HDD kalian masuk ke folder tempat file yang tadi kamu download
kalo punya ane di folder download jadi printahnya
root@laelamadjnun-laptop:/home/laelamadjnun# cd Downloads/
3. Lalu install dengan printah
dpkg -i mysql-workbench-oss_5.2.16-1ubu910_i386.deb
nah nanti akan keluar error kurang lebih bunyinya seperti ini :
Selecting previously deselected package mysql-workbench-oss.4. Tapi jangan kawatir yang saya tebali itu adalah dependensi yang dibutuhkan. untuk test saya coba
(Reading database ... 202302 files and directories currently installed.)
Unpacking mysql-workbench-oss (from mysql-workbench-oss_5.2.16-1ubu910_i386.deb) ...
dpkg: dependency problems prevent configuration of mysql-workbench-oss:
mysql-workbench-oss depends on libzip1; however:
Package libzip1 is not installed.
mysql-workbench-oss depends on python-paramiko; however:
Package python-paramiko is not installed.
mysql-workbench-oss depends on python-pexpect; however:
Package python-pexpect is not installed.
dpkg: error processing mysql-workbench-oss (--install):
dependency problems - leaving unconfigured
Processing triggers for desktop-file-utils ...
Errors were encountered while processing:
mysql-workbench-oss
ketikan printah apt-get install libzip1 tp anehnya muncul seperti ini :
You might want to run `apt-get -f install to correct these:5. Nah itu sudah diberi tahu gimana kita harus menginstal dependensi yang tulisanya saya tebalkan
The following packages have unmet dependencies:
mysql-workbench-oss: Depends: python-paramiko but it is not going to be
installed
Depends: python-pexpect but it is not going to be install
yaitu
apt-get -f installmaka ke 3 dependensinya akan terinstall secara otomatis
6. Setelah dependinsinya sukses di install kita ulangi perintah ke 3
dpkg -i mysql-workbench-oss_5.2.16-1ubu910_i386.deb7. lalu cek di aplicarion--> programming --> MySQL Workbench
8. Install succesfull
lihat gambar SS nya:

Status : Dokumentasi
Penterjemah : Ron-Ron
Available link for download
Thursday, October 20, 2016
INSTALL DAN KONFIGURASI SSH DI UBUNTU 10 10
INSTALL DAN KONFIGURASI SSH DI UBUNTU 10 10
Hmmmmmmmmm,,, lagi seru - serunya neh belajar buat server, beberapa waktu yang lalu sempat buat beberapa server di ubuntu linux, kali neh akan kita coba membuat ssh, secara sederhana ssh digunakan untuk remote server melalui client. oke deh, hal-hal yg perlu diprhatikan adalah os ubuntu dong tentunya, kemudian secagkir teh dan cemilan, :)
1. masuk ke terminal kemudian install ssh dengan perintah "apt-get install ssh"
2. setelah selesai, sebenarnya secara sederhana ssh sudah terinstall dan dapat digunakan, tapi jika ingin di konfigurasi, ketikan perintah "sudo nano /etc/ssh/sshd_config
3. cari tulisan port 22
ganti dengan port 22 hal ini ditujukan agar port ssh tidak gampang ditebak
4. Cari tulisan "PermitRootLogin no"
ini dimaksudkan agar orang gak bisa langsung masuk ke root, jadi harus ke user biasa dulu.
5. simpan dengan menekan ctrl+x tekan y kemudian enter
6. Restart ssh dengan perintah /etc/init.d/ssh restart
oke selesai, untuk menguji nya gunakan program putty dari client yang berbasis windows.
Sekian dulu, begitulah secara sederhana membuat ssh di ubuntu 10.10 yang saya gunakan. Semoga bermanfaat, Trima kasih buat para master master ubuntu.
Assalamualaikum..
Available link for download
Monday, October 10, 2016
Its as simple as that Installing Microsoft Fonts in Ubuntu!
Its as simple as that Installing Microsoft Fonts in Ubuntu!
From Ubuntu Blog
Installing Microsoft Fonts September 9, 2005
Posted by Carthik in ubuntu.
trackback
Even if you use OpenOffice, you might still want all the Microsoft TrueType fonts so that documents created using Word or PowerPoint look as they were supposed to when you open them with OpenOffice. Also, with the Microsoft Fonts installed we browsing will be better since the pages will look as the designer originally intended them to. Most webpages are designed with Microsoft fonts in mind. The stylesheet specify these fonts. On Linux, when these specified fonts are not available on your computer, they are replaced with generic equivalents. With these fonts installed, you will see the page as it was designed. To install the fonts, all you need to do in Ubuntu is to install the msttcorefonts package. Instructions for installation are given below.
The Truetype Microsoft fonts provided by the package include:
* Andale Mono
* Arial Black
* Arial (Bold, Italic, Bold Italic)
* Comic Sans MS (Bold)
* Courier New (Bold, Italic, Bold Italic)
* Georgia (Bold, Italic, Bold Italic)
* Impact
* Times New Roman (Bold, Italic, Bold Italic)
* Trebuchet (Bold, Italic, Bold Italic)
* Verdana (Bold, Italic, Bold Italic)
* Webdings
Installing Microsoft Truetype fonts on Ubuntu
You can install the MS core fonts by installing the msttcorefonts package. To do this, enable the “Universe” component of the repositories. This is done by default in Feisty. After you do that, use the following command from the command line:
$sudo apt-get install msttcorefonts
This will give you the core fonts, but if there are other TrueType fonts that you want installed, it is as easy as copying the font files to the ~/.fonts/ directory.
After installing new fonts, you will have to log out and log in again to be able to see and use the new fonts. If you want to avoid this, you can regenerate the fonts cache by issuing the following command:
$sudo fc-cache -fv
Available link for download
Tuesday, October 4, 2016
Install VirtualBox di Ubuntu
Install VirtualBox di Ubuntu
[laelamadjnun.info]- Instal VirtualBox di Ubuntu, Virtual Box/Virtual Machine kalo kita orang yang sering bergelut di dunia IT minimal pernah dengar yang namanya virtual box, rasanya lucu saja kalo orang terbiasa di dunia IT belum pernah denger tentang virtual box, kalo belum tau ya sedikit saja jelaskan, VirtualBox adalah perangkat lunak virtualisasi, yang dapat digunakan untuk mengeksekusi sistem operasi "tambahan" di dalam sistem operasi, intinya kita mencoba sistem operasi didalam sistem operasi dan sifatnya virtual.
Langkah-langkahnya yang saya baca dari situs resminya www.virtualbox.org sbb :
1. Tambahkan salah satu list dibawah ini pada /etc/apt/sources.list saya gunakan editor gedit
dengan perintah sbb:
root@laelamadjnun-laptop:/home/laelamadjnun# gedit /etc/apt/sources.list
disini saya memakai ubuntu 9.10 karmic koala maka tambahkan baris yang ke 5 . pada list
deb http://download.virtualbox.org/virtualbox/debian oneiric contrib

deb http://download.virtualbox.org/virtualbox/debian natty contrib

deb http://download.virtualbox.org/virtualbox/debian maverick contrib non-free

deb http://download.virtualbox.org/virtualbox/debian lucid contrib non-free

deb http://download.virtualbox.org/virtualbox/debian karmic contrib non-free

deb http://download.virtualbox.org/virtualbox/debian hardy contrib non-free

deb http://download.virtualbox.org/virtualbox/debian squeeze contrib non-free

deb http://download.virtualbox.org/virtualbox/debian lenny contrib non-free
repository.
2. setelah list di tambahkan kita register dulu dengan copykan perintah berikut
3. Update lah dengan perintah sbb:
wget -q http://download.virtualbox.org/virtualbox/debian/oracle_vbox.asc -O- |

sudo apt-key add -
4. lalu install dengan perintah sbb :
sudo apt-get update
sudo apt-get install virtualbox-4.0by
- virtualbox-4.0 to install VirtualBox 4.0.14
- virtualbox-3.2 to install VirtualBox 3.2.12
- virtualbox-3.1 to install VirtualBox 3.1.8
- virtualbox-3.0 to install VirtualBox 3.0.14
- virtualbox-2.2 to install VirtualBox 2.2.4
- virtualbox-2.1 to install VirtualBox 2.1.4
- virtualbox-2.0 to install VirtualBox 2.0.12
- virtualbox to install VirtualBox 1.6.6
usermod -g vboxusers (nama user login)
6. coba cek di apilkations -> system tools
kalo ga ada ketik virualbox di terminal
sumber : https://www.virtualbox.org/wiki/Linux_Downloads
Status : Dokumentasi
Available link for download
INSTALL DAN KONFIGURASI SQUID PROXY SERVER DI UBUNTU MAVERICK
INSTALL DAN KONFIGURASI SQUID PROXY SERVER DI UBUNTU MAVERICK

Sebenernya neh artikel uda lama pengen di posting, tapi belum sempat-sempat, sebenernya malas juga sih, hehehe.... alnya panjang banget, kayak si gery yang gk abis abis,, tapi mungkin tentang proxy server sudah banyak beserak di blog-blog ataupun website, tapi gak da salah nya juga kalau aku ikut serta, mana tau berguna. hhehehe.. oke deh cukup basi-basi nya.
Untuk defenisi proxy sendiri gak ku jabarkan, cuma install dan konfigurasi nya aja, kali neh ku coba dengan menggunakan mesin ubuntu 10.10 dengan asumsi sebagai berikut
Internet---MODEM—--Ubuntu server---HUB---CLIENT (192.168.0.2 s/d 192.168.0.xxx)
eth1 eth0
192.168.1.5 192.168.0.1
install terlebih dahulu squid nya
#apt-get install squid3
alasan menggunakan squid3 adalah, dalam ubuntu 10.10 tidak adanya file restart jika menggunakan squid jadi pakai squid3.
KONFIGURASI
A. Membuat NAT / Router
Agar client bisa terkoneksi dengan internet maka kita harus mengaktifkan ip forward. Hal ini bertujuan agar ppp0 atau eth0 bisa berkomunikasi dengan eth1 dan sebaliknya.
edit file /etc/sysctl.conf :
cari teks
# net.ipv4.ip_forward=1
Aktifkan dengan menghilangkan tanda “#”, menjadi :
net.ipv4.ip_forward=1
untuk meningkatan pengaman sebaiknya anti spoofing attack dan kernel map protect diaktifkan, cari teks2 dibawah ini...
# net.ipv4.conf.default.rp_filter=1
# net.ipv4.conf.all.rp_filter=1
Aktifkan dengan menghilangkan tanda “#”, menjadi:
net.ipv4.conf.default.rp_filter=1
net.ipv4.conf.all.rp_filter=1
kemudian save. Dan lakukan perintah untuk mengaktifkan konfigurasi tersebut
#sysctl -p
B. Membuat NAT dengan command iptables
#iptables -t nat -A POSTROUTING -o eth1 -j MASQUERADE
tapi lebih baik diketik script tersebut diketik di rc.local sebelum exit atau tepat diatas exit.
jika tidak diletakan di /etc/rc.local script tersebut hanya bersifat sementara, jika komputer restart, maka akan hilang.
keterangan :
-t nat adalah pembuatan tabel NAT pada iptables
-A POSTROUTING adalah menambah satu aturan baru pada bagian POSTROUTING
-j MASQUERADE adalah perintah ini akan mengarahkan rantai paket kebagian tertentu tanpa source.
Kemudian coba test ping ke client. JIka conec internet, tahap awal sukses.
C. KONFIGURASI SQUID
edit konfigurasi squid3
#nano /etc/squid3/squid.conf
cari http_port 3128
setelah ketemu hilangkan tanda pagarnya tambahkan kata transparent sehingga menjadi
http_port 3128 transparent
cari cache_mem
pada tutorial ini saya gunakan 16 MB
#Default:
cache_mem 16 MB
kemudian kita akan membuat acl (access control list) .
Cari acl to_localhost dst 127.0.0.0/8 0.0.0.0/32 ::1
dan tepat di bawahnya ketikan
acl jaringan src 192.168.0.0/24
http_access allow jaringan
2 Baris diatas digunakan untuk memberikan access control ke jaringan 192.168.0.0 selain itu maka jaringan lain tidak akan bisa terkoneksi ke jaringan luar, karna tidak diizinkan oleh squid.
Berikutnya kita akan membuat content filter
cari acl CONNECT method CONNECT
dan tepat dibawahnya kita akan membuat acl yang baru, ketikan
acl tutup dstdomain "/etc/squid3/tutup"
http_access deny tutup
Simpan konfigurasi yang telah dibuat.
Buat file yang berisi alamat-alamat situs yang akan diblokir pada directory /etc/squid3/tutup. misalnya www.facebook,com dan sebagainya.
# nano /etc/squid3/tutup
Disini saya mencontohkan facebook.com dan twitter.com
Setelah itu simpan.
Kemudian restart squid
#/etc/init.d/squid3 restart
* Restarting Squid HTTP Proxy 3.x squid3 * Creating Squid HTTP Proxy 3.x cache structure
2012/09/11 11:36:52| Creating Swap Directories
[ OK ]
naaaaah langkah terakhir adalah.....
ketikan script berikut kedalam rc.local diatas exit
iptables -t nat -A PREROUTING -p tcp -s 192.168.0.0/24 --dport 80 -j REDIRECT --to-port 3128
#nano /etc/rc.local
iptables -t nat -A PREROUTING -p tcp -s 192.168.0.0/24 --dport 80 -j REDIRECT --to-port 3128
perintah script tersebut digunakan untuk membelokan semua paket yang berasal dari port 80 ke port 3128.
simpan konfigurasi yang telah dibuat.
Reboot server / restart server
#reboot
proxy server selesai di buat....................................
Hasil tes browser dari client

thanks,,,, Untuk para master ubuntu dan salam untuk pecinta ubuntu
selamat mencoba
BY : Agus Wiana
Available link for download
Sunday, October 2, 2016
installing Ubuntu on old computers
installing Ubuntu on old computers
Installing Ubuntu 6.10 on old computers low on Ram
I had been using Linux on my thinkpad for over 2 years now , it isnt a piece of marvel just a modest configuration Pentium M 1.4 GHz , 256 MB Ram and a 40 GB HDD with a slow cdrom drive(hey my original DVD drive got damaged had to use the cheap stuff from market),i had used all sort of Linux distributions from from Fedora Cores to Kubuntu to Linspire to OpenSuse none of the distribution gave me any sort of problem during installation or running . However Ubuntu Linux 6.10 installation and Live CD mode really provided a lot of headaches to me , i had installed Ubuntu 6.06 earlier which installed and ran in Live CD mode quiet flawlessly but on running the latest Ubuntu Distro i was shell shocked the Live CD took more than 10 minutes to just load on my PC not to mention on clicking the install button there was a further 10 - 15 minutes coffee break for me . Now these times may seem absurd to you but its true coupled with low ram , slow cd drive and apparently Ubuntu not using my swap drive made this a hellish experience .
So i started to find some solution to my problem it was quiet apparent that during ubuntu Linux live cd mode it wasnnullt using my swap partition for storing information and was using temporary swap partition and ram only which was the main cause for the UN-responsiveness . Now if i somehow switched on the swap partition it would really make this installation a lot quicker.
Here is how i did this : -
Method 1:
Boot from the Live CD normally and allow ubuntu to load the full gnome desktop enviornment . Now after the Gnome has loaded fully press Control + F1 which will take you to the console .
Now if you have swap partition on a drive say /dev/hda5 type this
sudo swapon /dev/hda5
This would activated the swap partition which then could be used by the Live CD .
To see if the partition turned up correctly issue command sudo swapon -s
Also if you donnullt have a swap partition i would recommend that you create one by launching the fdisk utility also try having some unpartitioned space for use during the installer since the manual editing of the partition table in ubuntu during installation tends to crash the installer over 80% of times i had numerous hang up during installation of ubuntu.
Now go back to the graphical mode by pressing Ctrl + F7 and continue with the installation process.
Method 2:
This is quiet similar to Method 1 but the unwanted wait for Ubuntu to get loaded can be avoided , also if for some reason ubuntu freezes after loading the graphical enviornment or is just way too slow even to load the graphical enviornment . Put the Ubuntu CD in the drive boot the computer now when the Grub Boot menu is show press F6 to edit the boot options and add line single at the end of the boot parameters .
Now boot the edited menu item , this would boot the ubuntu system into the console quiet quickly now do the following steps : -
Now if you have swap partition on a drive say /dev/hda5 type this sudo swapon /dev/hda5
This would activated the swap partition which then could be used by the Live CD .
To see if the partition turned up correctly issue command
sudo swapon -s
Also if you donnullt have a swap partition i would recommend that you create one by launching the fdisk utility also try having some unpartitioned space for use during the installer since the manual editing of the partition table in ubuntu during installation tends to crash the installer over 80% of times i had numerous hang up during installation of ubuntu.
now at the console type : startx
this would take you to the graphical Gnome enviornment and if all went fine it should work at a usable speed. Now go to System - > Administration -> Install and follow the instructions to install the Ubuntu System on to the hard drive .
Now after installation is complete remove the CD from the drive re-boot the computer now at the grub menu press e and remove single from the boot parameter boot the ubuntu system.
After ubuntu is loaded type sudo gedit /boot/grub/grub.conf and remove all reference to single from the configuration file. and reboot the computer your ubuntu should be configured to be used on this computer now.
If you find this article useful do leave a comment of appreciation. :)
Ambuj Varshney < blogambuj@gmail.com>
For Linux On Desktop (http://linuxondesktop.blogspot.com)
Available link for download
Subscribe to:
Posts (Atom)